January Page
Monday, February 28, 2011
Scrappy Hour
So I have gotten a lil behind on scrappy hour display... but these are the pages we done the last couple of months. Now if I can just get myself to add pictures and such to complete them. =) I get so caught up in creating pages I forget to finish them with precious memories.
January Page
January Page
Sponge Bob Birthday
I so loved how this card turned out.
I made it for my sweet lil great nephew 2nd Birthday...
I used the big shot scallop square, a few circle punches, and then I had to free hand the nose n mouth but it wasn't to bad. Just makes you want to sing "who lives in a pine apple under the sea-sponge bob square pants" =D
Saturday, February 19, 2011
Sweet lil Valentine*
Dimond Fold Card
I made this for my husbands birthday.
I wanted something simple but a bit MANly of course =).
Seen this done on a Christmas card and thought; how cute.
So here is how mine turned out. Super cute right* ;) !
I wanted something simple but a bit MANly of course =).
Seen this done on a Christmas card and thought; how cute.
So here is how mine turned out. Super cute right* ;) !
I got the how to from "STAMPERS QUEST"
You will love casing this card over and over again.
Supplies: 4" x 12" cardstock of your choice,
ruler, pencil, bone folder, paper cutter (f0r scoring)
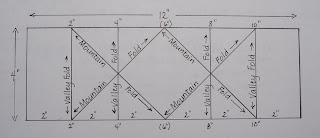
Directions: Working from top edge
1. Following the picture of the template above, make a small, light, pencil mark at center (6") and then score at 2", 4", 8", 10".
2. Score a diagonal line to the right from the 2" score mark down to the center (6") pencil mark.
3. Score a diagonal line to the right from the center (6") pencil mark down to the 10" score mark.
4. Score a diagonal line to the left from the center (6") pencil mark down to the 2" score mark.
5. Score a diagonal line to the left from the 10" score mark down to the center (6") pencil mark.
6. Using your bone folder for crisp lines, follow the template to see where to make the 'valley' and 'mountain' folds. When closed, the card is 4" x 4" and when open, it will stretch out, as you will see.
7. Decorate and embellish as you desire. The large triangle panels could be stamped, embellished, etc. The first one I made had a sentiment in the first triangle and my message in the last one. I only had a stamped image in the center of the card.
Wednesday, February 16, 2011
Friday, February 4, 2011
Cased Swap
Wednesday, February 2, 2011
Valentine Lip Balm Holder
Here's how you can create your own: 5 3/4" X 3 1/2" CS and for the out side DSP 5 1/2" X 3 3/8. Score both CS and DSP at 2 1/2" X 3 1/4" and go ahead and attach with adhesive. Slice 2 marks 3/4" in the middle at 1 1/2" X 2 3/8". this is for the lip balm. when i added the ribbon i attached it underneath the designer paper in two pieces front in back instead of wrapping all the way around. Hope you have as much fun making these as i did. You could use this for any occasion.
Subscribe to:
Posts (Atom)